CESM and UFS
Overview
Teaching: min
Exercises: minQuestions
What is CESM?
How does it differ from UFS?
Why do we use CESM in this class?
Objectives
Understand the differences between these two models
Learn about CESM
Last week you learned about the NOAA/Unified Forecast System from Dr. Stan. Today we will learn about the NCAR/Community Earth System Model. How would you know which model you want to use for your work? Here are some pros/cons of each model.
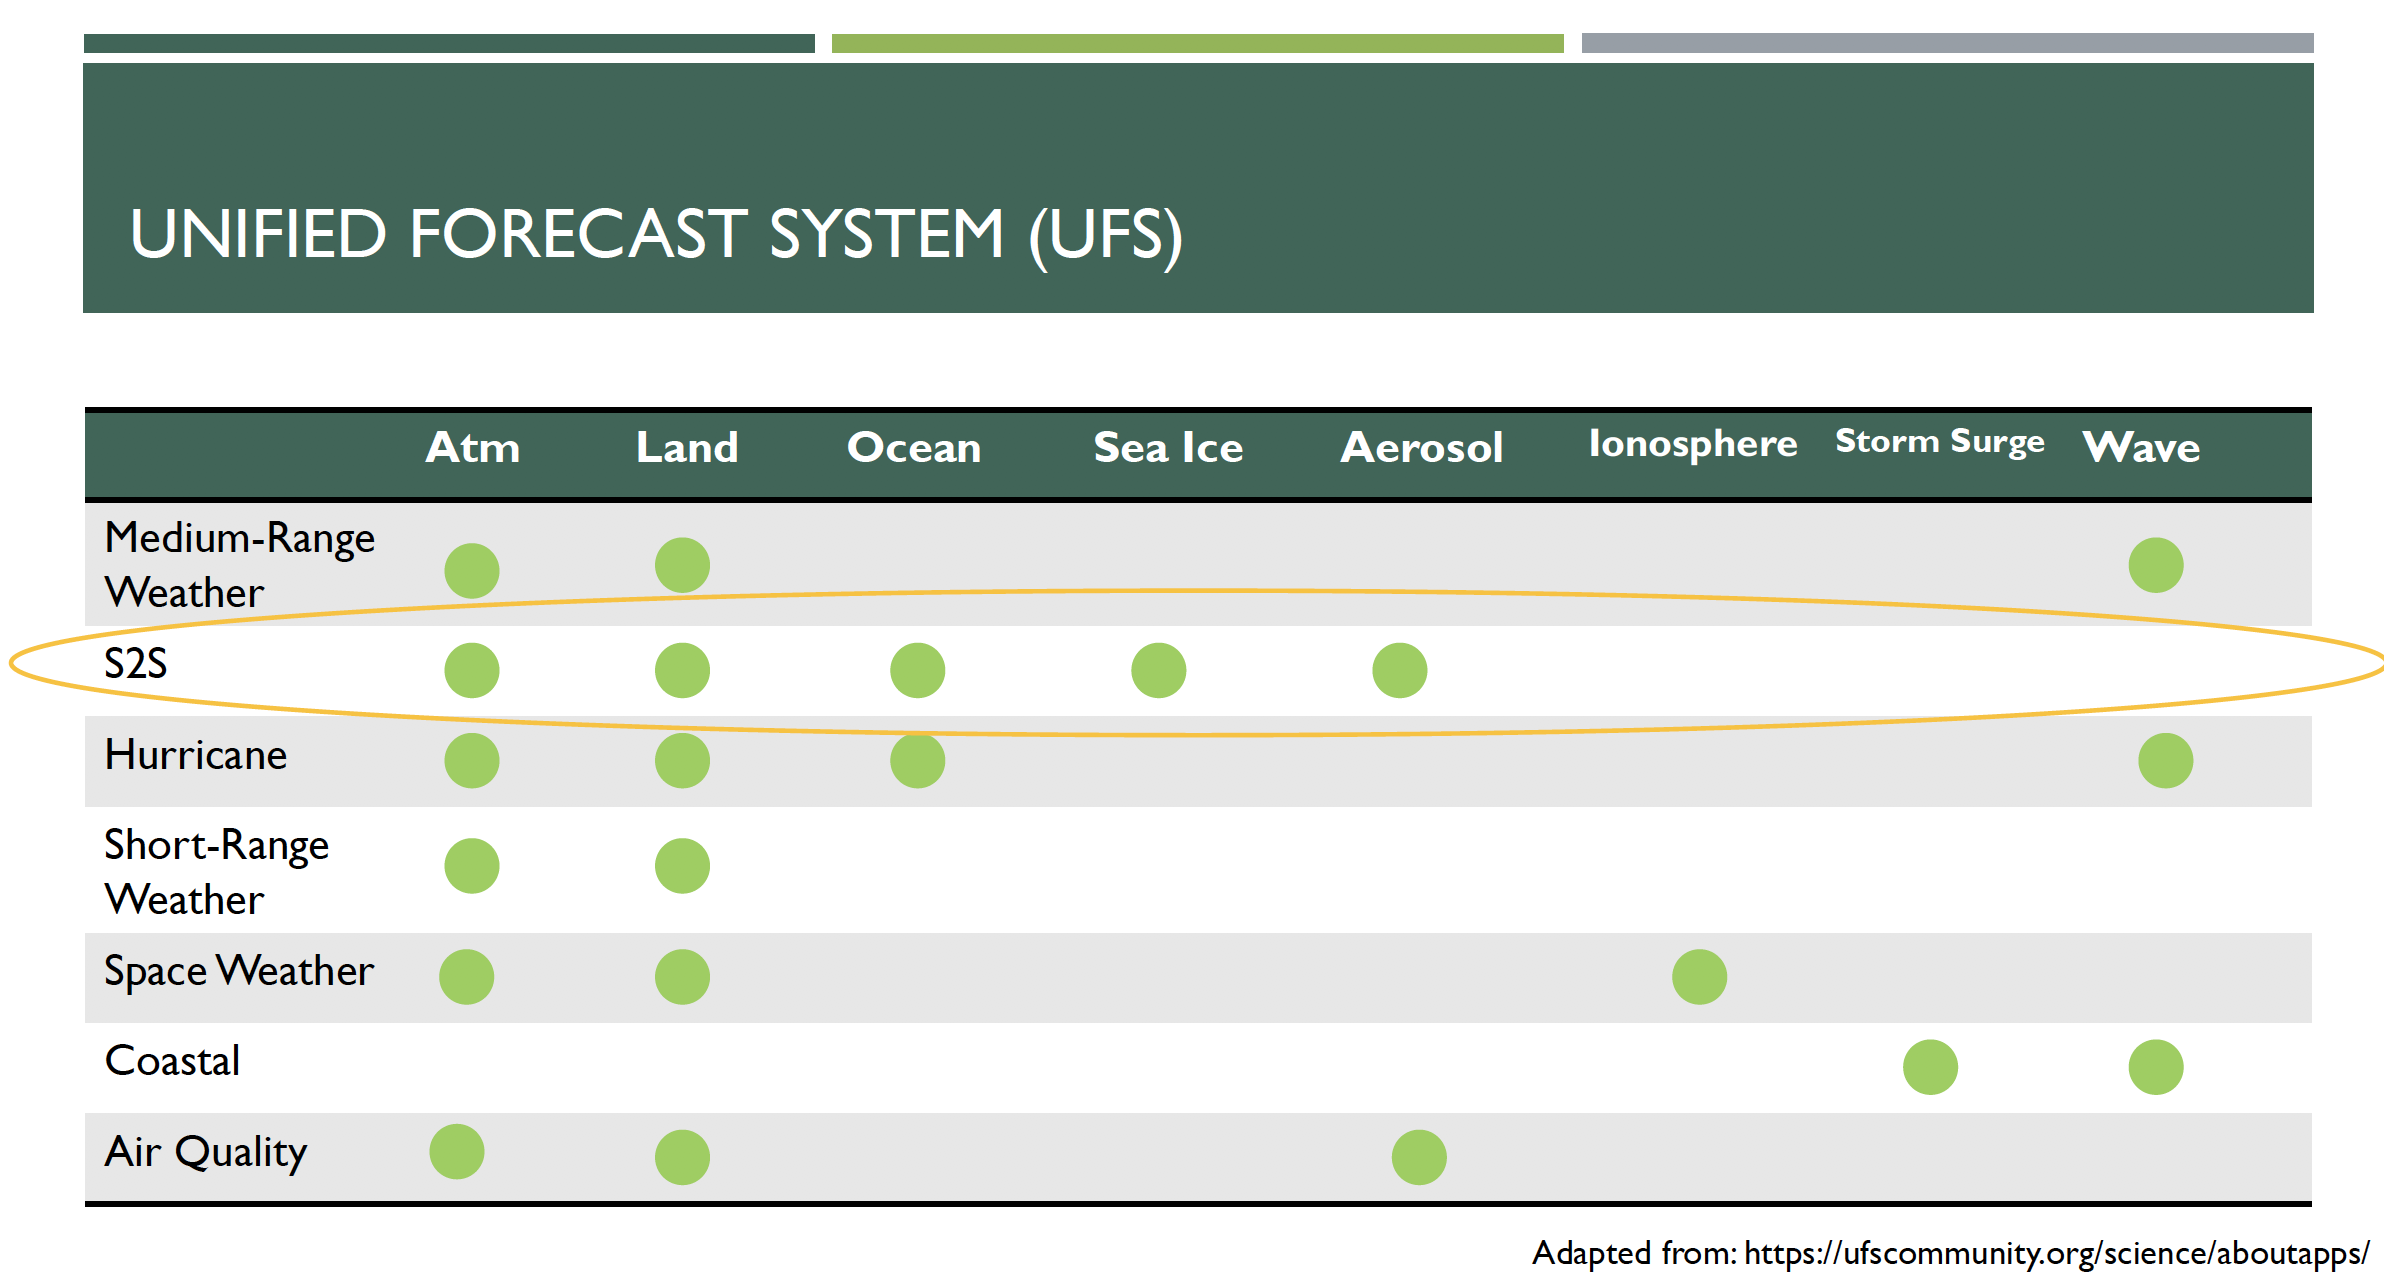
NOAA/Unified Forecast System (UFS)
- Website: https://www.ufscommunity.org/
- UFS is not yet easy to run for research purposes
- Challenging to modify for a specific purpose, but this will improve in the future – concerted effort to document and provide community support
- The “public release” version is only the Atm & Land components, although experimental unsupported atm-land-ocn versions exist.
- Existing, publicly available experiments consist of Atm/Land model re-forecasts and real-time forecasts
- Its primary mission is centered around prediction
- Components consist of Atm, Land, Ocn, Sea Ic, Aerosol, Ionosphere, Storm Surge, Waves
- Using the UFS for research has the potential to directly feedback to improving operational predictions.
- Several people in AOES work with this model as a research tool (e.g. Stan, Cash, Kinter)
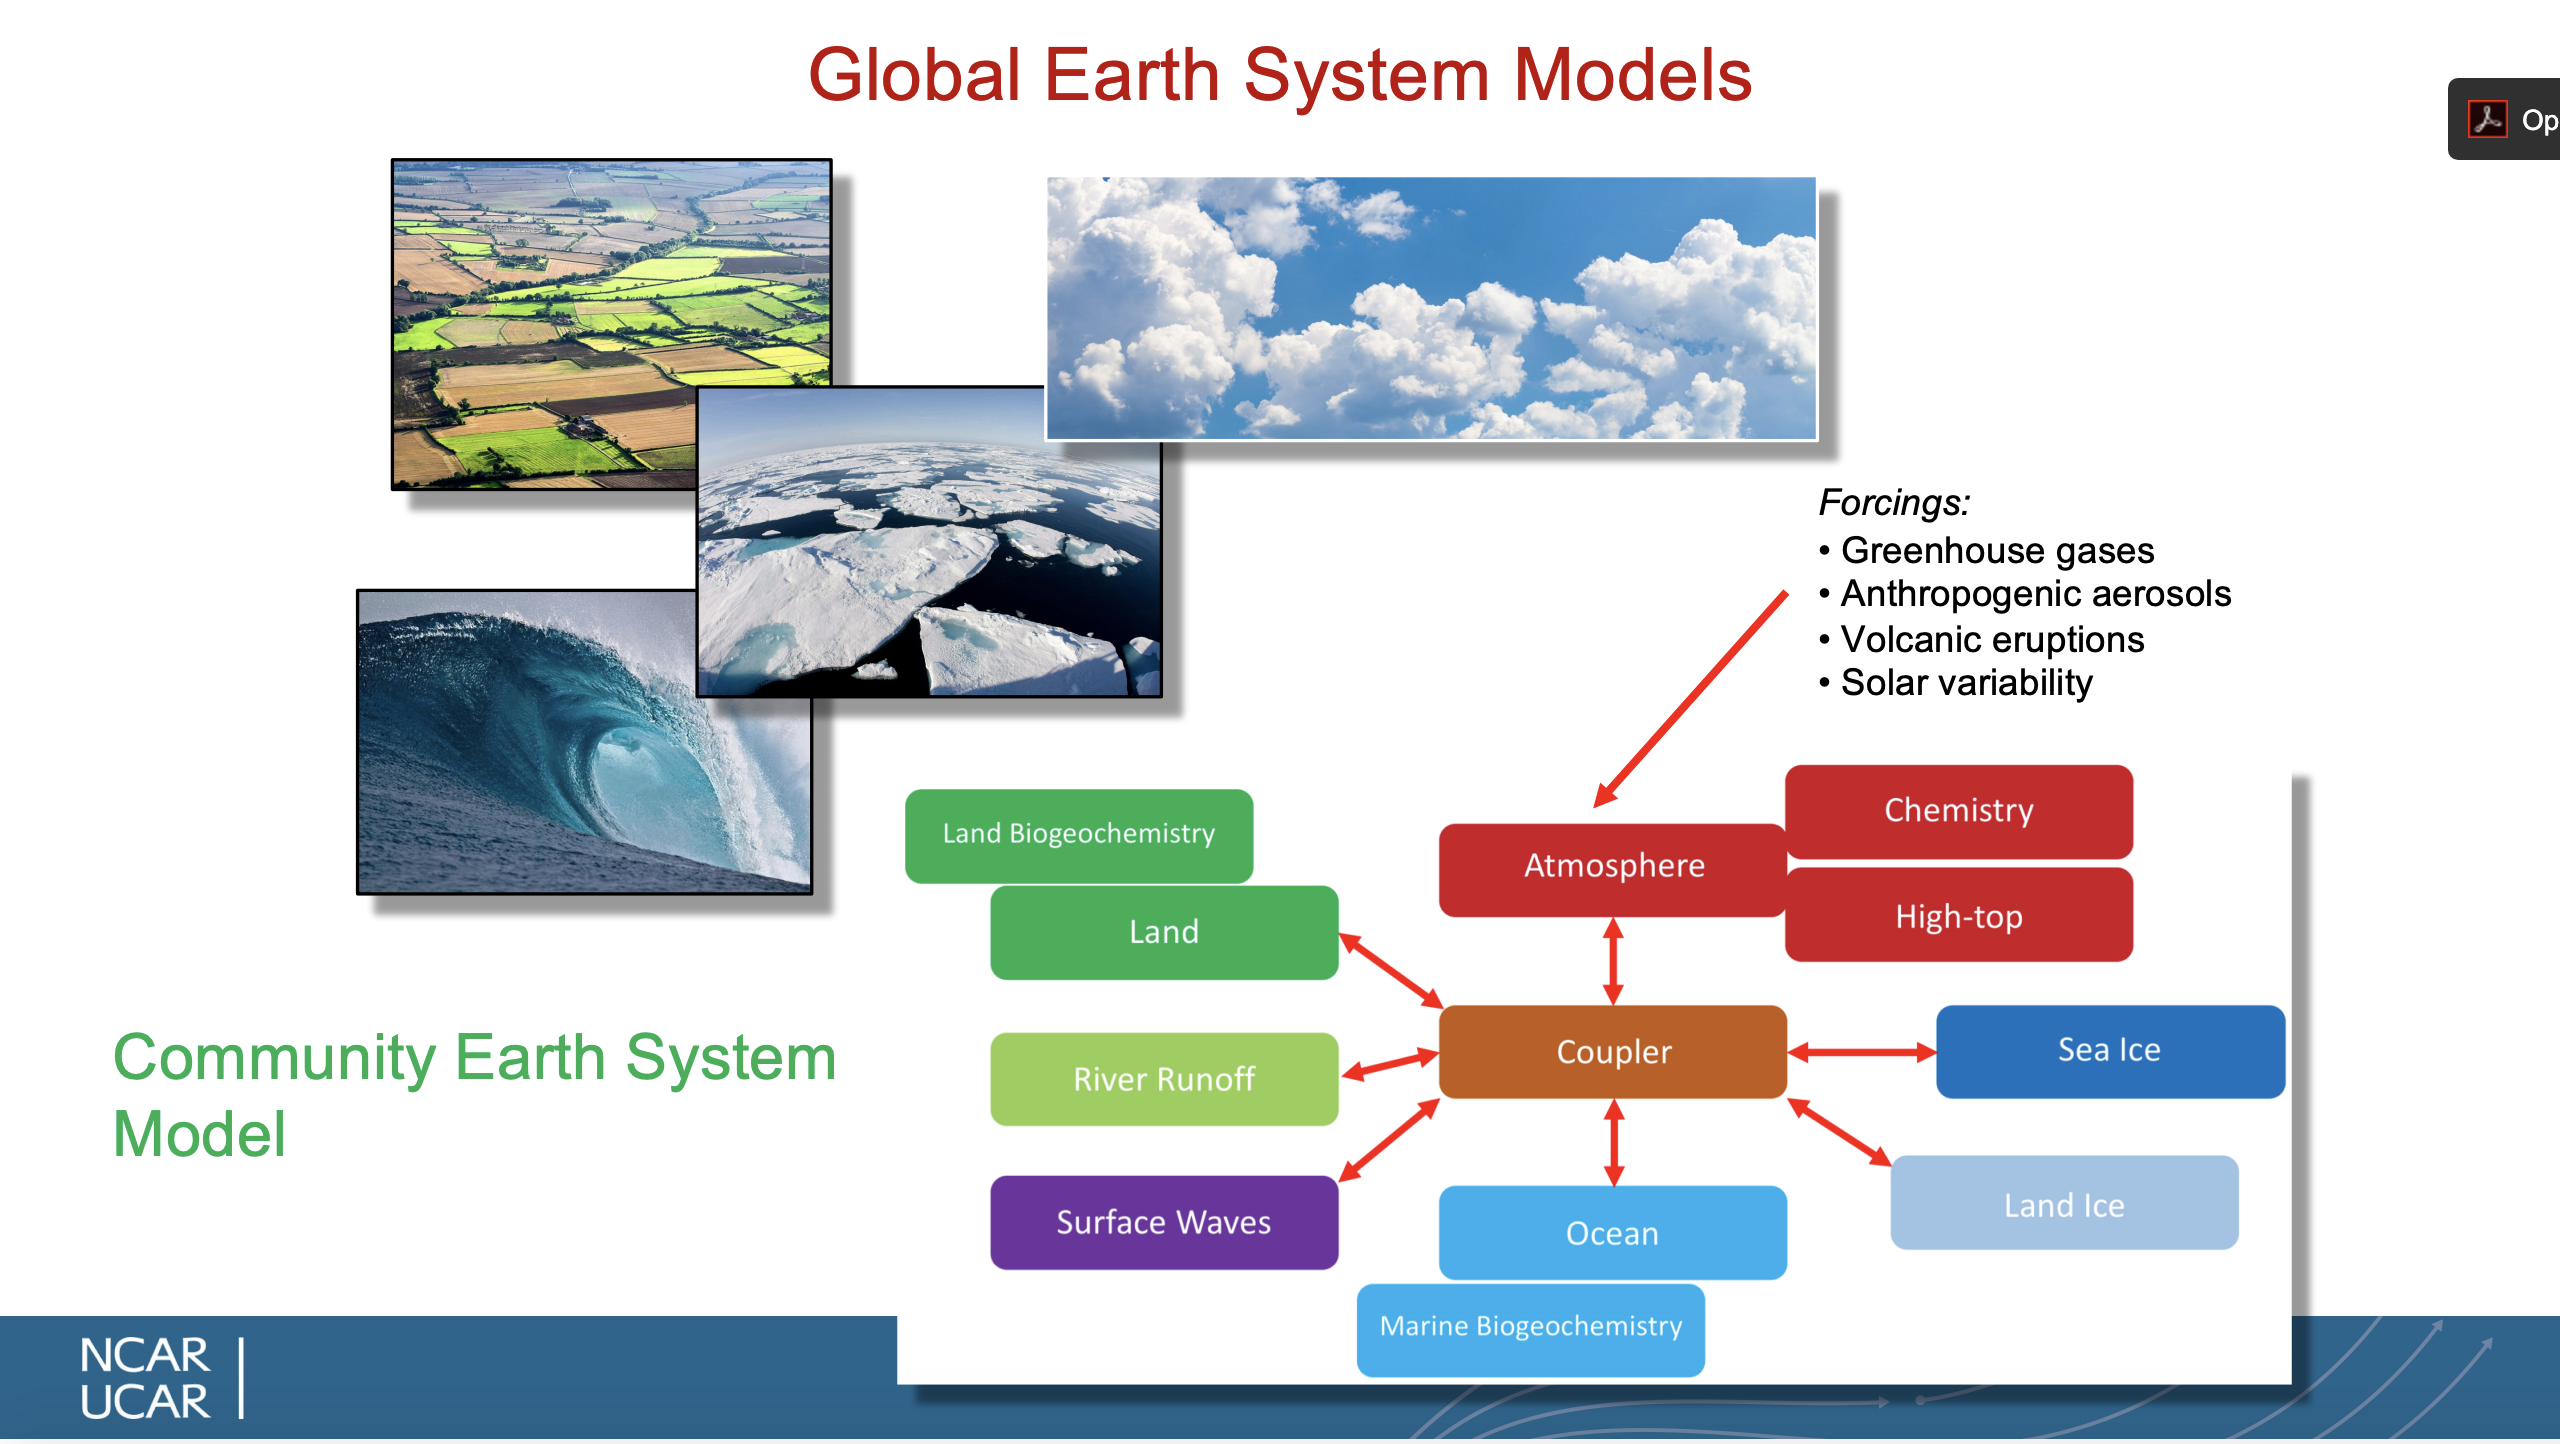
NCAR/Community Earth System Model (CESM)
- Designed for community use – easy to use for research
- Large community of people working with CESM – Organized in working groups that are open to all (http://www.cesm.ucar.edu/working_groups/)
- Easy to get help, lots of documentation: (http://www.cesm.ucar.edu/)
- CESM has different (and more) Earth system components
- Many components can be combined together in endless combinations
- Easy to change configuration (e.g. output frequency, grid).
- Primary mission is climate oriented
- Many existing climate simulations and now hindcasts (CMIP, large ensemble, decadal prediction, S2S prediction)
- More recently starting to be used for prediction/predictability purposes (e.g. new Earth System Prediction Working Group).
- Lots of people in AOES work with this model.
Key Points
CESM Workflow
Overview
Teaching: 0 min
Exercises: 0 minQuestions
What is the CESM Workflow?
Objectives
The NCAR/CESM consists of many component models which are their own software programs. These models talk to each other through another piece of software called a coupler. There is yet even another software system, called the Workflow. It allows us to select various model components and configurations for our experiments.

Workflow
The workflow used by CESM is called the Coupling Infrastructure for Modeling Earth (CIME). It includes:
- Coupling infrastructure (how do the components talk to each other)
- Data and stub models (structure to allow componenets to be active or inactive)
- Testing infrastructure
- Python scripts and XML configuration files for the Case control system (this is what is important to us for running the model)
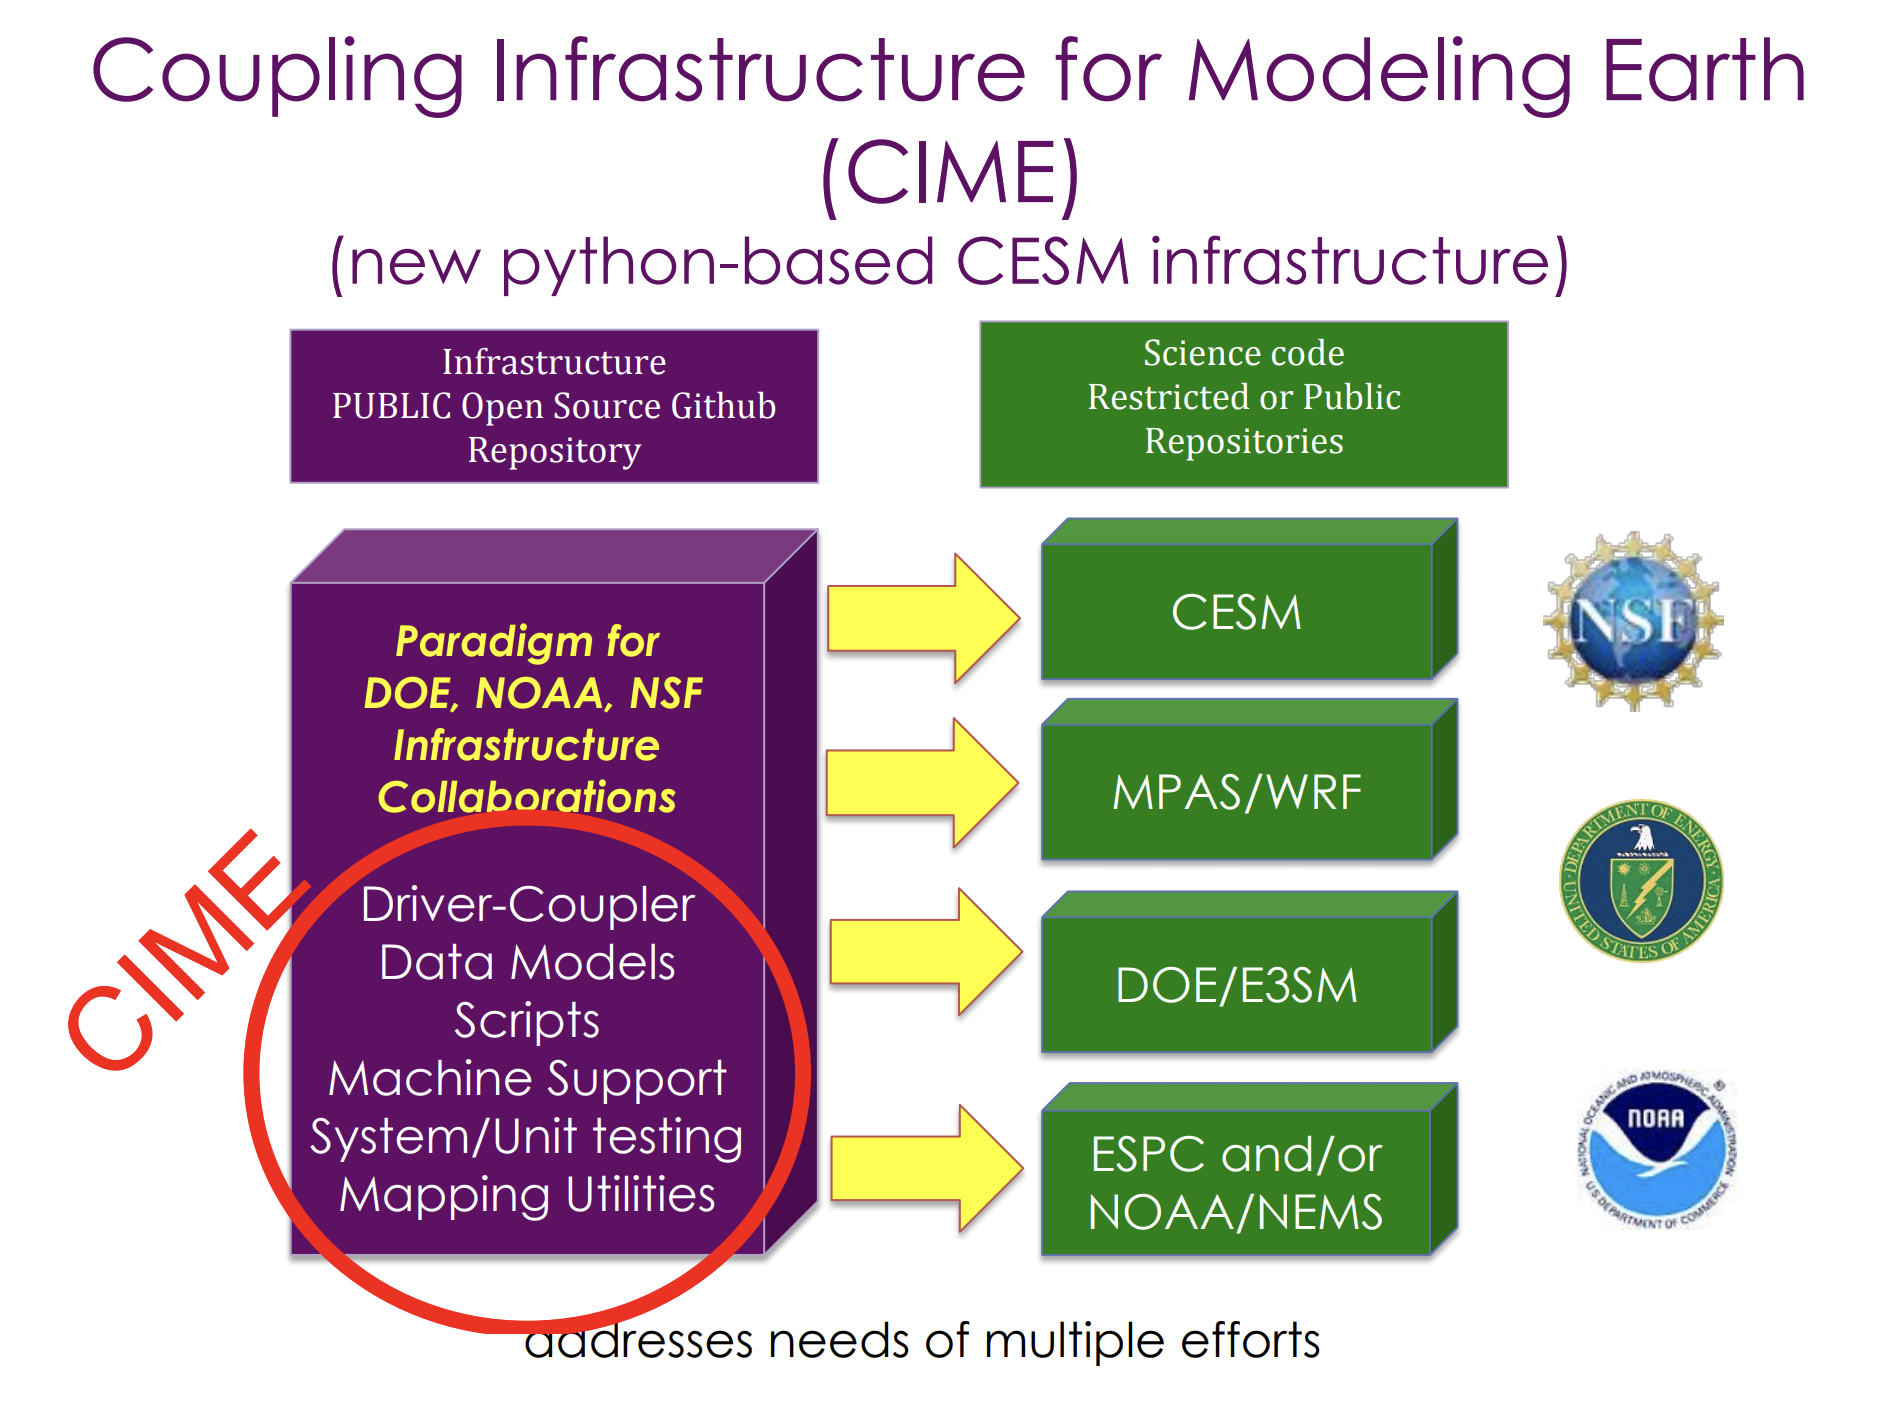
CIME is being used by other modeling groups, so learning how to configure and run the CESM using CIME may translate to being able to work with other models.
Key Points
The NCAR Computing Environment
Overview
Teaching: 0 min
Exercises: 0 minQuestions
How do I use the NCAR Computers?
Objectives
You have now have accounts on the NCAR computers cheyenne.ucar.edu and casper.ucar.edu.
Login to cheyenne
$ ssh -X -l username cheyenne.ucar.edu
Follow the instructions you received regarding Duo 2-factor authentication
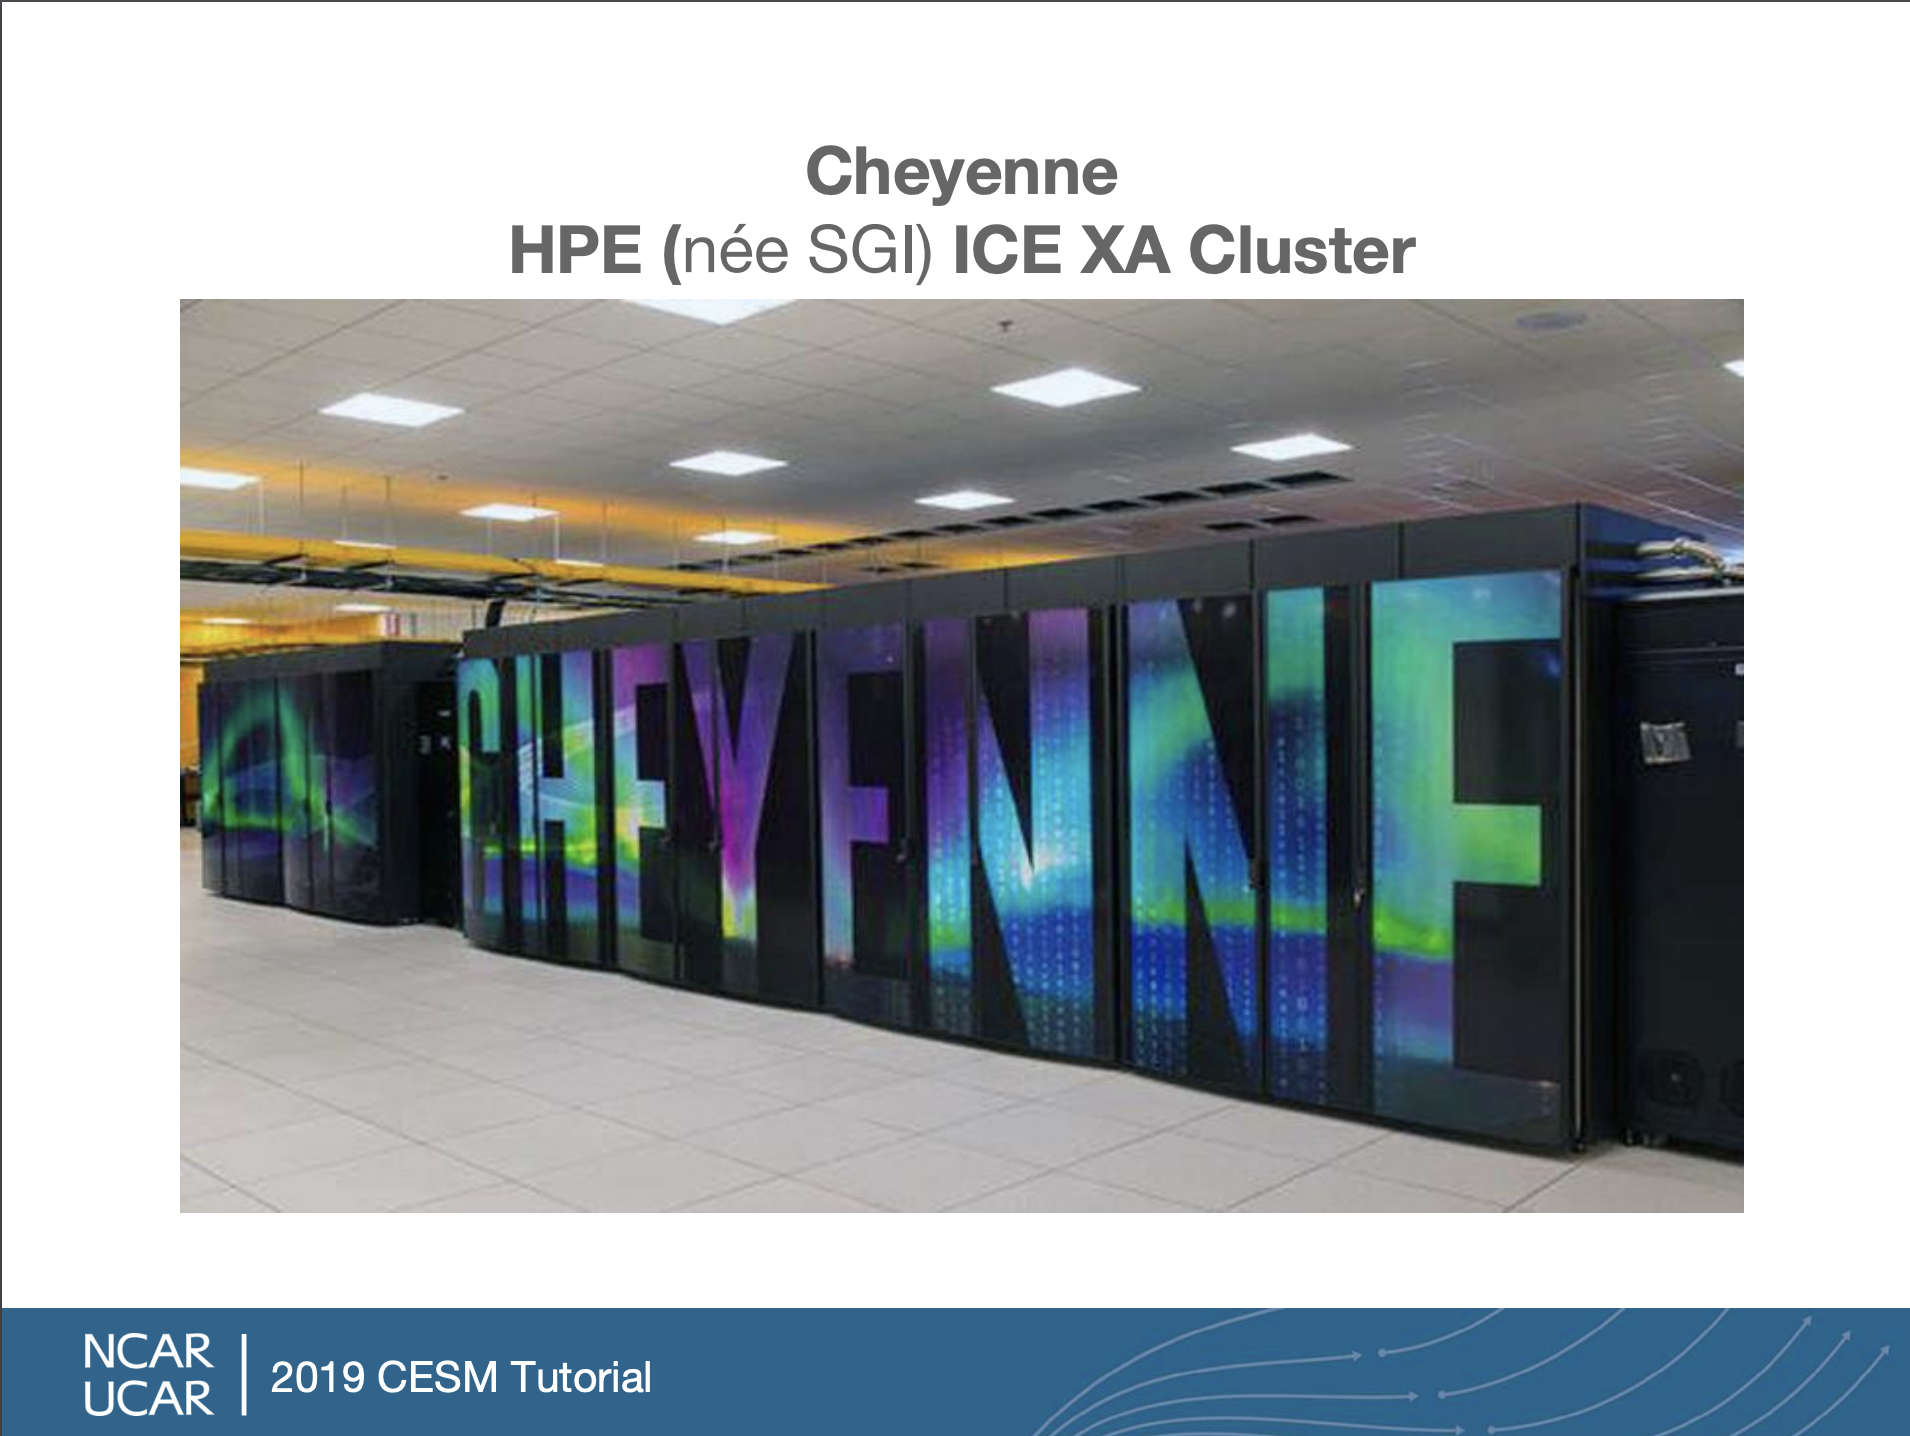
Cheyenne is a supercomputer, but to the user it is just like any Unix computer and we run the same Unix commands here.
Your home directory on NCAR
Use the
pwdcommand to see what your home directory is called.
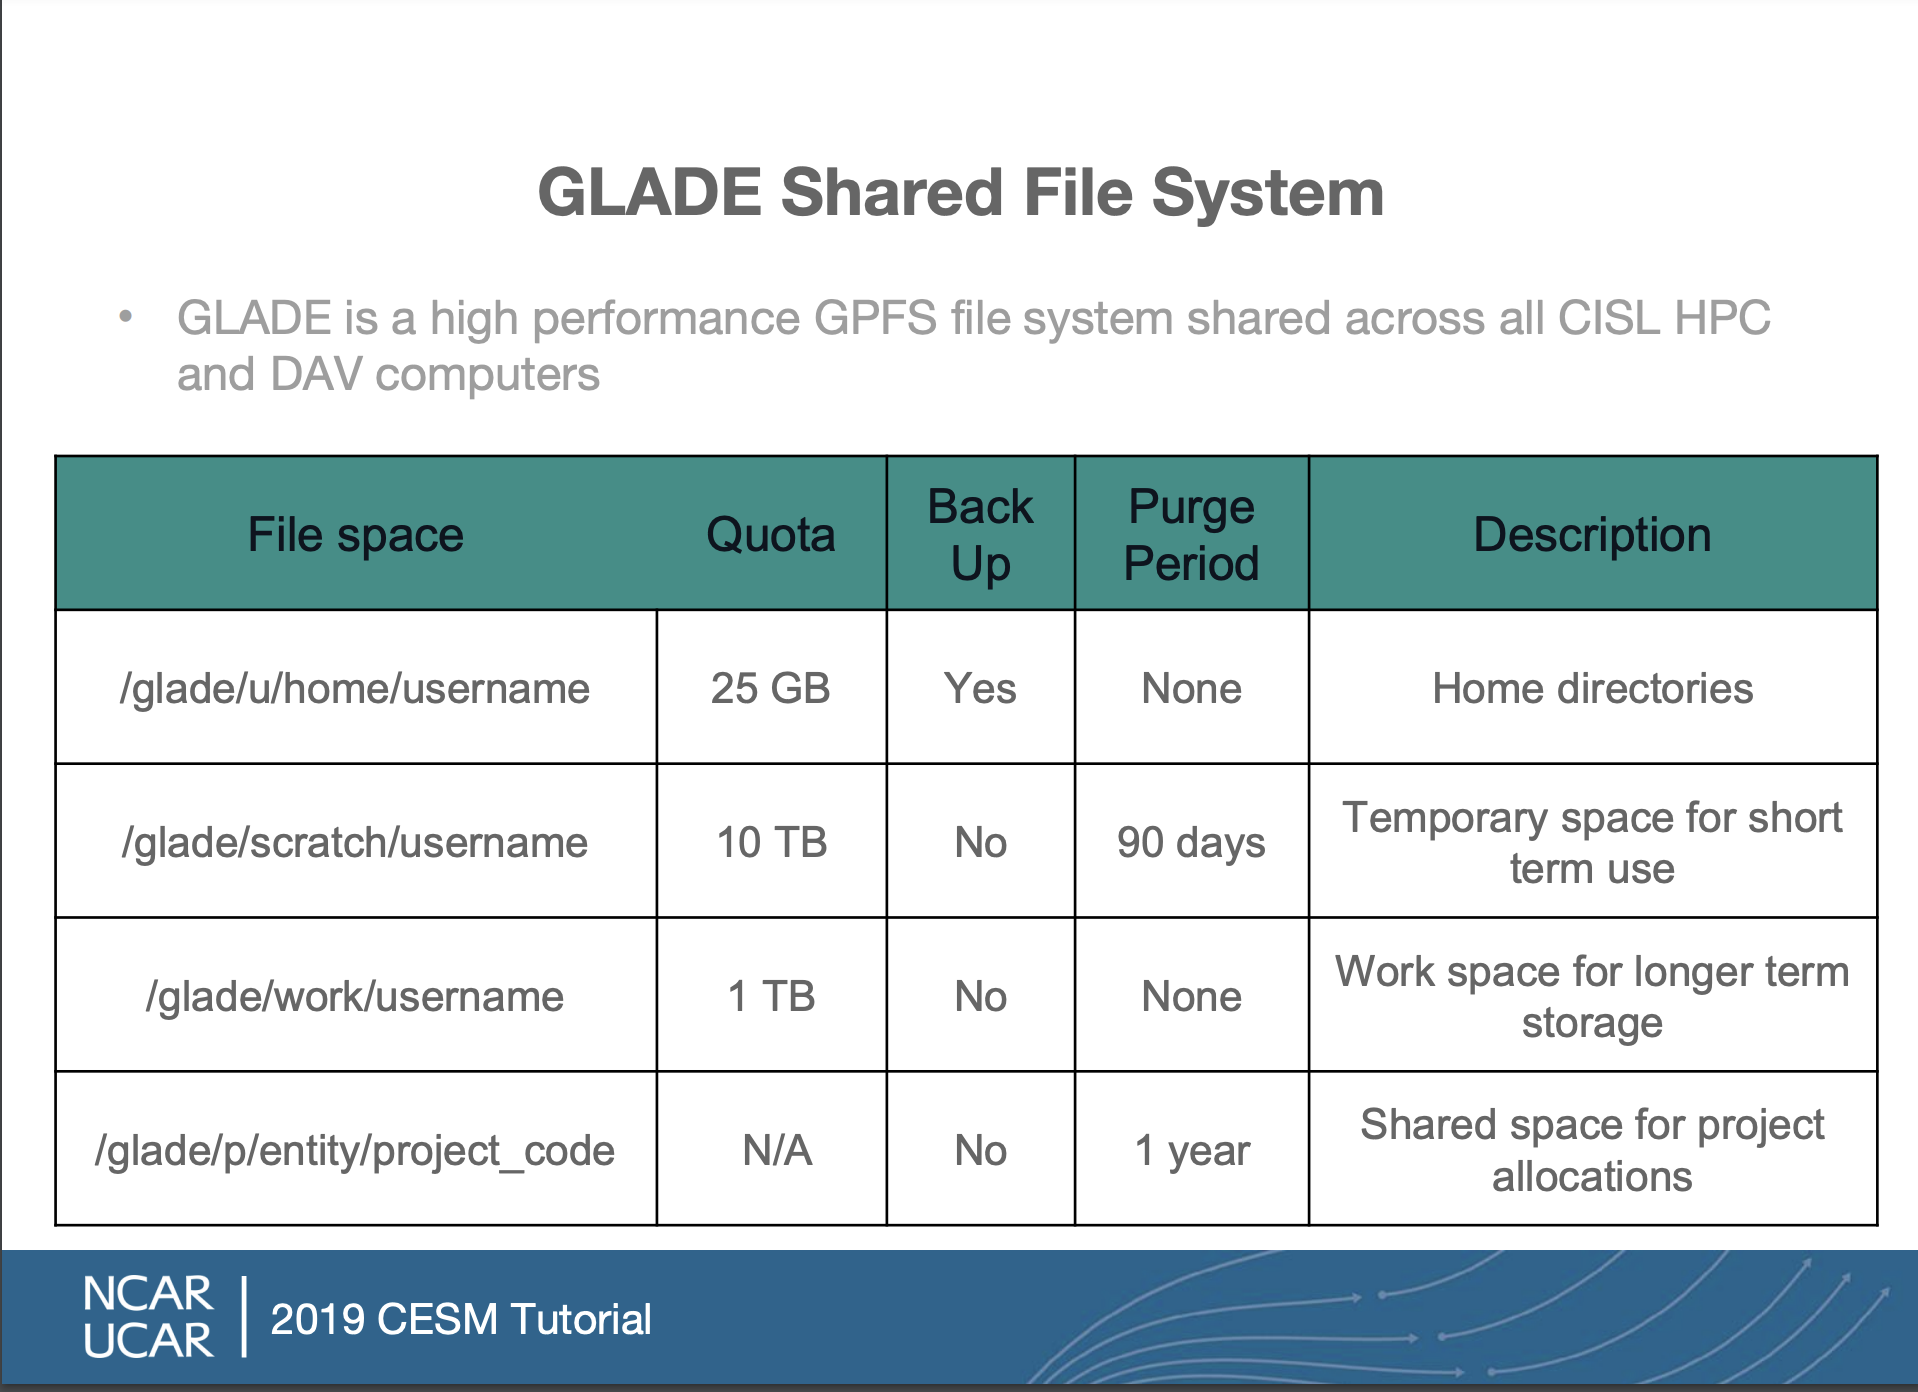
To run a model we will need disk space beyond just our home directory. By default, with your NCAR account, you have space in your home directory, a temporary space called scratch and a work directory all under a system called the GLADE shared file system. How do I know what directories I have and how much space is available?
Your disk space on glade
Use the
gladequotacommand to seeNote that only the home directory is backed up.
Key Points
Downloading CESM
Overview
Teaching: 0 min
Exercises: 0 minQuestions
How do I download CESM?
Objectives
We will now download the model and all the setup files needed for it. These are one-time steps.
Go to your /glade/work/ directory
$ cd /glade/work/kpegion
Download the CESM from Github
$ git clone -b release-cesm2.1.1 https://github.com/ESCOMP/cesm.git cesm2.1.1
Change to the cesm2.1.1 directory
$ cd cesm2.1.1
Let’s take a look in that directory and talk about what is there and what is not. Need to get the model components.
Checkout all the model components
$ ./manage_externals/checkout_externals
Sometimes this hangs and gives an error about connecting. If it does, try again. If it asks you a question about the certificate, you can select p for permanent.
Leave this running over break.
Key Points
CESM Quickstart
Overview
Teaching: 0 min
Exercises: 0 minQuestions
How do I setup and run the CESM?
Objectives
You have now downloaded all the model components and the CIME workflow. Let’s take a look:
From your /glade/work/username/cesm2.1.1 directory, see what is there.
$ ls
What was added after running
manage_externals
Organization of the CESM Directory
CESM has a set of keywords that refer to specific directories, they are:
SRCROOT- Path to your CESM code; containsCIMEROOTCIMEROOT- Path of your CIME directory which is sub-directory underSRCROOTCASEROOT- Path to your case directoriesOBJROOT- Path to your build directoryEXEROOT- Path to your run directoryDOUT_S_ROOT- Path to your archived data directory
Find your SRCROOT and CIMEROOT
Your SRCROOT and CIMEROOT exist after downloading the CESM. What are the exact paths for you?
CIMEROOT
The cime subdirectory contains a subdirectory called scripts. This is the directory we will use initially for setting up the model.
Change into this subdirectory and take a look.
$ cd cime/scripts
$ ls
The final one-time step is to create a directory called cases in your home directory.
$ mkdir ~/cases
The cases directory (also called your CASEROOT) will contain all the source code and configuration files for your model experiments.
Why do you think we would put something like this in our home directory?
Model Quickstart
Above were the one-time setup setps, now we move on to the steps you will do everytime to setup a new model experiment and run it.
Go into the scripts subdirectory in your CIMEROOT
$ cd /glade/work/kpegion/cesm2.1.1/cime/scripts
Create a new case
$ ./create_newcase --case ~/cases/b.day1.0 --res f19_g17 --compset B1850 --project UGMU0032
This created a new subdirectory for your new case. Change to that directory.
$ cd ~/cases/b.day1.0
Setup the case
$ ./case.setup
Build the executable (this will take while)
$ qcmd -- ./case.build
This will take awhile. While the model is compiling, we will talk about what the create_newcase command did.
Potential Errors
Some users received an error indicating that their account was overspent or expired. This happened to users who already had a NCAR account associated with a project charge code that was no longer available. To resolve this, set the
PBS_ACCOUNTenvironment variable to a valid charge code for this class.$ export PBS_ACCOUNT=UGMU0032This setting will go away after you logout, so you will need to set it everytime for the correct project charge code associated with the project you are working on.
What did we just do?
create_newcase takes 3 arguments
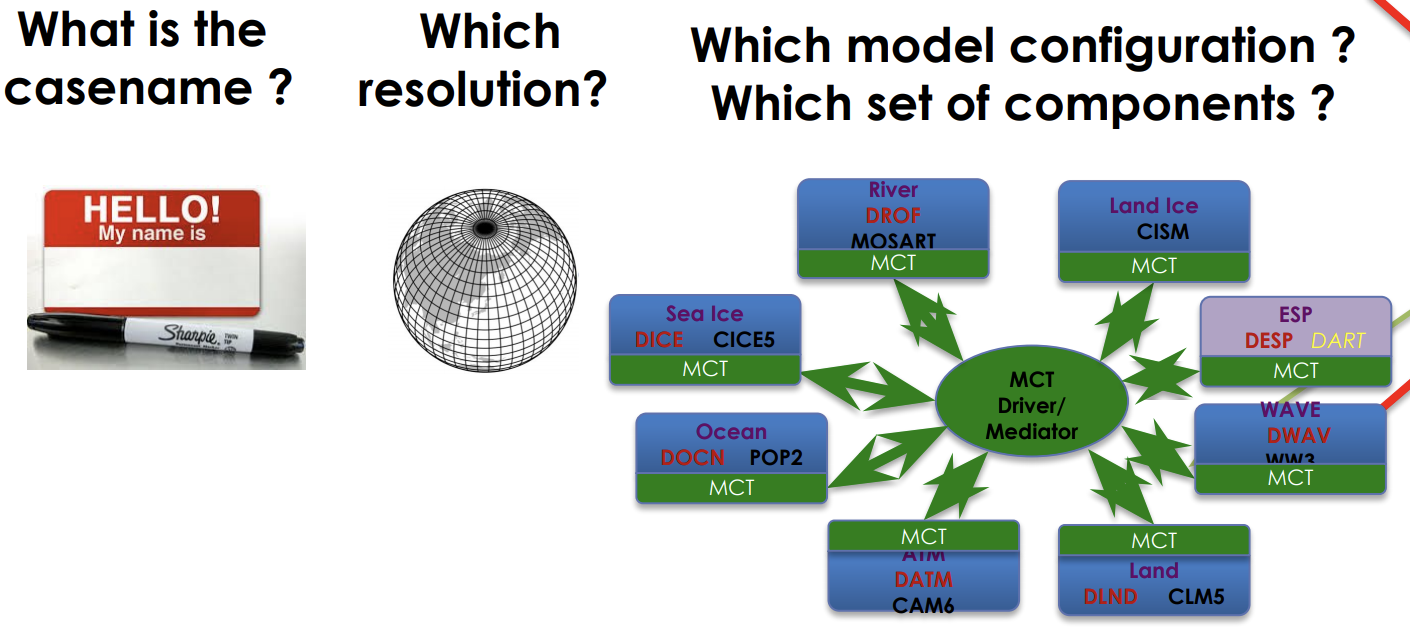
Case Name (case)
This is the name and location of your experiment
- Can be anything you want
- It is a good idea to make it descriptive so you can distinguish different cases
- NCAR has reccomended naming conventions
This experiment is called b.day1.0 and it is located in my cases directory in my home directory.
Resoultion (res)
Specifies the resolution and grid of the model components. Each model resolution can be specified by its alias or long name.

How to know what grids are available? There’s a tool
$ CIMEROOT/scripts/query_config --grids --long
and a website
Understanding grids
The resolution f09_g17 is the standard resolution used for CMIP simulations with the CESM. What is the resolution of the atmosphere/land and ocean in this model?
Component Set (compset)
Sets which versions and component models are active vs. inactive and what forcings are used.
The first letter B in this compset indicate that all components are active. The 1850 means that the 1850 greenhouse gas forcings will be used.
How do I know what the different compsets are?
There’s a tool
$ CIMEROOT/scripts/query_config --compsets
and a website
Some Common Compset Starting Characters
Ball components are activeFatmosphere is active; ocean and ice are inactiveIland is activeGocean is activeAaquaplaned (atm with no land)
Certain compsets are scientifically validated meaning they have been extensively tested.
You can create your own compsets.
It is strongly suggested that you start developing any experiments from a scientifically validated compset, then make changes.
The selected compset determines which grids are available.
The CASEROOT directory
This was created when you ran create_newcase. Change directory and take a look at it:
$ cd ~/b.day1.0
$ ls
It contains a bunch of .xml files which are configuration files. We will learn how to modify them next week.
What happened when we ran case.setup?
- Your RUNDIR and EXEROOT directories were created
- A bunch of user.nl.xxx files were created (these are namelist files that provide configuraiton details to different component models)
- Created the
case.runandcase.st_archivescripts - Create a CaseDocs directory
What happened when we ran case.build?
- Checked that all the input data was available
- Created the namelists from the user specified ones above
- Compiled the model
How can I find out what my CASEROOT, CIMEROOT, etc. are if I forget?
$ ./xmlquery RUNDIR,EXEROOT,CASEROOT,CIMEROOT
Now what?
If your build has completed, then you can submit your model run to the queue.
$ ./case.submit
You can see that is is in the queue, using
$ qstat -u username
What do we see regarding the model run in the queue?
You can logout now. While we are away, our model will run. We will return next week to take a look!
Key Points